34-35.玩转Linux操作系统
玩转Linux操作系统
说明:本文中对Linux命令的讲解都是基于名为CentOS的Linux发行版本,我自己使用的是阿里云服务器,系统版本为CentOS Linux release 7.6.1810。不同的Linux发行版本在Shell命令和工具程序上会有一些差别,但是这些差别是很小的。
操作系统发展史
只有硬件没有软件的计算机系统被称之为“裸机”,我们很难用“裸机”来完成计算机日常的工作(如存储和运算),所以必须用特定的软件来控制硬件的工作。最靠近计算机硬件的软件是系统软件,其中最为重要的就是“操作系统”。“操作系统”是控制和管理整个计算机硬件和软件资源、实现资源分配和任务调配、为系统用户以及其他软件提供接口和环境的程序的集合。
没有操作系统(手工操作)
在计算机诞生之初没有操作系统的年代,人们先把程序纸带(或卡片)装上计算机,然后启动输入机把程序送入计算机,接着通过控制台开关启动程序运行。当程序执行完毕,打印机输出计算的结果,用户卸下并取走纸带(或卡片)。第二个用户上机,重复同样的步骤。在整个过程中用户独占机器,CPU等待手工操作,资源利用率极低。
批处理系统
首先启动计算机上的一个监督程序,在监督程序的控制下,计算机能够自动的、成批的处理一个或多个用户的作业。完成一批作业后,监督程度又从输入机读取作业存入磁带机。按照上面的步骤重复处理任务。监督程序不停的处理各个作业,实现了作业的自动转接,减少了作业的建立时间和手工操作时间,提高了计算机资源的利用率。 批处理系统又可以分为单道批处理系统、多道批处理系统、联机批处理系统、脱机批处理系统。
分时系统和实时系统
分时系统是把处理器的运行时间分成很短的时间片,按时间片轮流把处理机分配给各联机作业使用。 若某个作业在分配给它的时间片内不能完成其计算,则该作业暂时中断,把处理机让给另一作业使用,等待下一轮调度时再继续其运行。由于计算机速度很快,作业运行轮转得很快,给每个用户的感觉是他独占了一台计算机。而每个用户可以通过自己的终端向系统发出各种操作控制命令,在充分的人机交互情况下,完成作业的运行。为了解决分时系统不能及时响应用户指令的情况,又出现了能够在在严格的时间范围内完成事件处理,及时响应随机外部事件的实时系统。
通用操作系统
- 1960s:IBM的System/360系列的机器有了统一的操作系统OS/360。
- 1965年:AT&T的贝尔实验室加入GE和MIT的合作计划开始开发MULTICS。
- 1969年:MULTICS项目失败,Ken Tompson赋闲在家,为了玩“Space Travel”游戏用汇编语言在当时已经被淘汰的PDP-7上开发了Unics。
> 注:很难想象,Unix这么伟大的操作系统,居然是一个赋闲在家的程序员(关键是老婆回娘家还带上了孩子)在一台被淘汰的设备上为了玩游戏开发出来的。 >
- 1970年~1971年:Ken Thompson和Dennis Ritchie用B语言在PDP-11上重写了Unics,并在Brian Kernighan的建议下将其更名为Unix。

- 1972年~1973年:Dennis Ritchie发明了C语言来取代可移植性较差的B语言,并开启了用C语言重写Unix的工作。
- 1974年:Unix推出了里程碑意义的第5版,几乎完全用C语言来实现。
- 1979年:从Unix第7版开始,AT&T发布新的使用条款,将Unix私有化。
- 1987年:Andrew S. Tanenbaum教授为了能在课堂上为学生讲解操作系统运作的细节,决定在不使用任何AT&T的源代码前提下,自行开发与Unix兼容的操作系统以避免版权上的争议,该系统被命名为Minix。

- 1991年:Linus Torvalds就读于芬兰赫尔辛基大学期间,尝试在Minix上做一些开发工作,但因为Minix只是作为教学用途的操作系统,功能并不强大,为了方便在学校的新闻组和邮件系统中读写和下载文件,Linus编写了磁盘驱动程序和文件系统,这些东西形成了Linux系统内核的雏形。

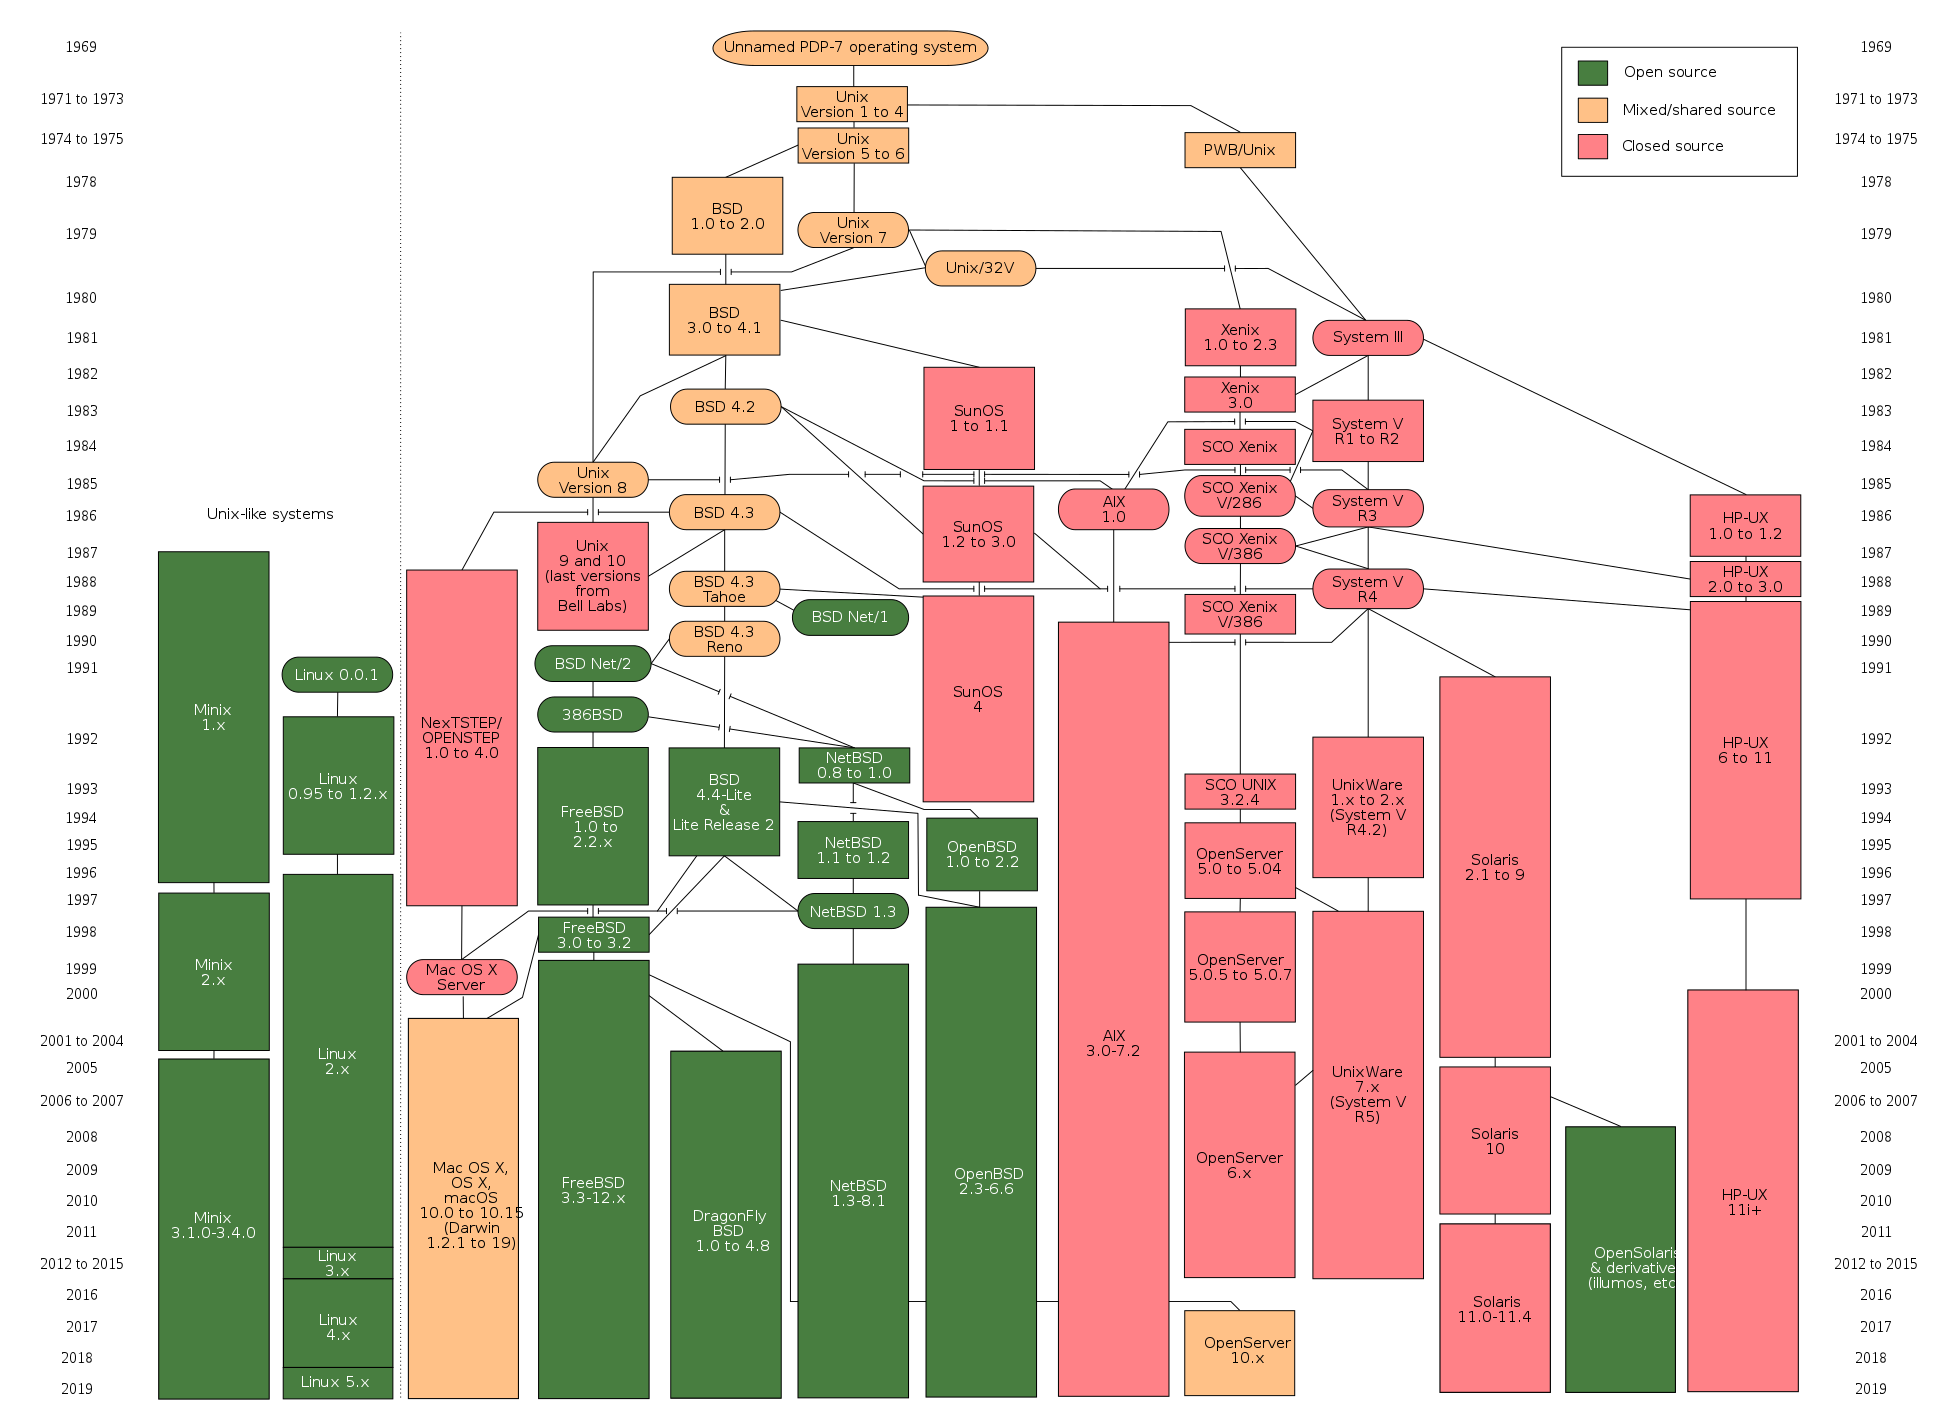
下图是Unix操作系统家族的图谱。
Linux概述
Linux是一个通用操作系统。一个操作系统要负责任务调度、内存分配、处理外围设备I/O等操作。操作系统通常由内核(运行其他程序,管理像磁盘、打印机等硬件设备的核心程序)和系统程序(设备驱动、底层库、shell、服务程序等)两部分组成。
Linux内核是芬兰人Linus Torvalds开发的,于1991年9月发布。而Linux操作系统作为Internet时代的产物,它是由全世界许多开发者共同合作开发的,是一个自由的操作系统(注意自由和免费并不是同一个概念,想了解二者的差别可以点击这里)。
Linux系统优点
- 通用操作系统,不跟特定的硬件绑定。
- 用C语言编写,可移植性强,有内核编程接口。
- 支持多用户和多任务,支持安全的分层文件系统。
- 大量的实用程序,完善的网络功能以及强大的支持文档。
- 可靠的安全性和良好的稳定性,对开发者更友好。
Linux系统发行版本
基础命令
Linux系统的命令通常都是如下所示的格式:
命令名称 [命名参数] [命令对象]- 获取登录信息 - w / who / last/ lastb。
``Shell [root ~]# w 23:31:16 up 12:16, 2 users, load average: 0.00, 0.01, 0.05 USER TTY FROM LOGIN@ IDLE JCPU PCPU WHAT root pts/0 182.139.66.250 23:03 4.00s 0.02s 0.00s w jackfrue pts/1 182.139.66.250 23:26 3:56 0.00s 0.00s -bash [root ~]# who root pts/0 2018-04-12 23:03 (182.139.66.250) jackfrued pts/1 2018-04-12 23:26 (182.139.66.250) [root ~]# who am i root pts/0 2018-04-12 23:03 (182.139.66.250) [root ~]# who mom likes root pts/0 2018-04-12 23:03 (182.139.66.250) [root ~]# last root pts/0 117.136.63.184 Sun May 26 18:57 still logged in reboot system boot 3.10.0-957.10.1. Mon May 27 02:52 - 19:10 (-7:-42) root pts/4 117.136.63.184 Sun May 26 18:51 - crash (08:01) root pts/4 117.136.63.184 Sun May 26 18:49 - 18:49 (00:00) root pts/3 117.136.63.183 Sun May 26 18:35 - crash (08:17) root pts/2 117.136.63.183 Sun May 26 18:34 - crash (08:17) root pts/0 117.136.63.183 Sun May 26 18:10 - crash (08:42) ``
- 查看自己使用的Shell - ps。
Shell也被称为“壳”或“壳程序”,它是用户与操作系统内核交流的翻译官,简单的说就是人与计算机交互的界面和接口。目前很多Linux系统默认的Shell都是bash(<u>B</u>ourne <u>A</u>gain <u>SH</u>ell),因为它可以使用tab键进行命令和路径补全、可以保存历史命令、可以方便的配置环境变量以及执行批处理操作。
``Shell [root ~]# ps PID TTY TIME CMD 3531 pts/0 00:00:00 bash 3553 pts/0 00:00:00 ps ``
- 查看命令的说明和位置 - whatis / which / whereis。
``Shell [root ~]# whatis ps ps (1) - report a snapshot of the current processes. [root ~]# whatis python python (1) - an interpreted, interactive, object-oriented programming language [root ~]# whereis ps ps: /usr/bin/ps /usr/share/man/man1/ps.1.gz [root ~]# whereis python python: /usr/bin/python /usr/bin/python2.7 /usr/lib/python2.7 /usr/lib64/python2.7 /etc/python /usr/include/python2.7 /usr/share/man/man1/python.1.gz [root ~]# which ps /usr/bin/ps [root ~]# which python /usr/bin/python ``
- 清除屏幕上显示的内容 - clear。
- 查看帮助文档 - man / info / --help / apropos。
``Shell [root@izwz97tbgo9lkabnat2lo8z ~]# ps --help Usage: ps [options] Try 'ps --help <simple|list|output|threads|misc|all>' or 'ps --help <s|l|o|t|m|a>' for additional help text. For more details see ps(1). [root@izwz97tbgo9lkabnat2lo8z ~]# man ps PS(1) User Commands PS(1) NAME ps - report a snapshot of the current processes. SYNOPSIS ps [options] DESCRIPTION ... ``
- 查看系统和主机名 - uname / hostname。
``Shell [root@izwz97tbgo9lkabnat2lo8z ~]# uname Linux [root@izwz97tbgo9lkabnat2lo8z ~]# hostname izwz97tbgo9lkabnat2lo8z [root@iZwz97tbgo9lkabnat2lo8Z ~]# cat /etc/centos-release CentOS Linux release 7.6.1810 (Core) ``
> 说明:cat是连接文件内容并打印到标准输出的命令,后面会讲到该命令;/etc是Linux系统上的一个非常重要的目录,它保存了很多的配置文件;centos-release是该目录下的一个文件,因为我自己使用的Linux发行版本是CentOS 7.6,因此这里会有一个这样的文件。 >
- 时间和日期 - date / cal。
``Shell [root@iZwz97tbgo9lkabnat2lo8Z ~]# date Wed Jun 20 12:53:19 CST 2018 [root@iZwz97tbgo9lkabnat2lo8Z ~]# cal June 2018 Su Mo Tu We Th Fr Sa 1 2 3 4 5 6 7 8 9 10 11 12 13 14 15 16 17 18 19 20 21 22 23 24 25 26 27 28 29 30 [root@iZwz97tbgo9lkabnat2lo8Z ~]# cal 5 2017 May 2017 Su Mo Tu We Th Fr Sa 1 2 3 4 5 6 7 8 9 10 11 12 13 14 15 16 17 18 19 20 21 22 23 24 25 26 27 28 29 30 31 ``
- 重启和关机 - reboot / shutdown。
```Shell [root ~]# shutdown -h +5 Shutdown scheduled for Sun 2019-05-26 19:34:27 CST, use 'shutdown -c' to cancel. [root ~]# Broadcast message from root (Sun 2019-05-26 19:29:27 CST):
The system is going down for power-off at Sun 2019-05-26 19:34:27 CST! [root ~]# shutdown -c
Broadcast message from root (Sun 2019-05-26 19:30:22 CST):
The system shutdown has been cancelled at Sun 2019-05-26 19:31:22 CST! [root ~]# shutdown -r 23:58 Shutdown scheduled for Sun 2019-05-26 23:58:00 CST, use 'shutdown -c' to cancel. [root ~]# shutdown -c
Broadcast message from root (Sun 2019-05-26 19:31:06 CST):
The system shutdown has been cancelled at Sun 2019-05-26 19:32:06 CST! ```
> 说明:在执行shutdown命令时会向登录系统的用户发出警告,可以在命令后面跟上警告消息来替换默认的警告消息,也可以在-h参数后通过now来表示立刻关机。 >
- 退出登录 - exit / logout。
- 查看历史命令 - history。
[root@iZwz97tbgo9lkabnat2lo8Z ~]# history
...
452  ls
453  cd Python-3.6.5/
454  clear
455  history
[root@iZwz97tbgo9lkabnat2lo8Z ~]# !454说明:查看到历史命令之后,可以用
!历史命令编号来重新执行该命令;通过history -c可以清除历史命令。
实用程序
文件和文件夹操作
- 创建/删除空目录 - mkdir / rmdir。
``Shell [root ~]# mkdir abc [root ~]# mkdir -p xyz/abc [root ~]# rmdir abc ``
- 创建/删除文件 - touch / rm。
``Shell [root ~]# touch readme.txt [root ~]# touch error.txt [root ~]# rm error.txt rm: remove regular empty file ‘error.txt’? y [root ~]# rm -rf xyz ``
touch命令用于创建空白文件或修改文件时间。在Linux系统中一个文件有三种时间:- 更改内容的时间 - mtime。
- 更改权限的时间 - ctime。
- 最后访问时间 - atime。
rm的几个重要参数:-i:交互式删除,每个删除项都会进行询问。-r:删除目录并递归的删除目录中的文件和目录。-f:强制删除,忽略不存在的文件,没有任何提示。
- 切换和查看当前工作目录 - cd / pwd。
> 说明:cd命令后面可以跟相对路径(以当前路径作为参照)或绝对路径(以/开头)来切换到指定的目录,也可以用cd ..来返回上一级目录。请大家想一想,如果要返回到上上一级目录应该给cd命令加上什么样的参数呢? >
- 查看目录内容 - ls。
-l:以长格式查看文件和目录。-a:显示以点开头的文件和目录(隐藏文件)。-R:遇到目录要进行递归展开(继续列出目录下面的文件和目录)。-d:只列出目录,不列出其他内容。-S/-t:按大小/时间排序。
- 查看文件内容 - cat / tac / head / tail / more / less / rev / od。
```Shell [root ~]# wget http://www.sohu.com/ -O sohu.html --2018-06-20 18:42:34-- http://www.sohu.com/ Resolving www.sohu.com (www.sohu.com)... 14.18.240.6 Connecting to www.sohu.com (www.sohu.com)|14.18.240.6|:80... connected. HTTP request sent, awaiting response... 200 OK Length: 212527 (208K) [text/html] Saving to: ‘sohu.html’ 100%[==================================================>] 212,527 --.-K/s in 0.03s 2018-06-20 18:42:34 (7.48 MB/s) - ‘sohu.html’ saved [212527/212527] [root ~]# cat sohu.html ... [root ~]# head -10 sohu.html
[root ~]# tail -2 sohu.html
[root ~]# less sohu.html ... [root ~]# cat -n sohu.html | more ... ```
> 说明:上面用到了一个名为wget的命令,它是一个网络下载器程序,可以从指定的URL下载资源。 >
- 拷贝/移动文件 - cp / mv。
``Shell [root ~]# mkdir backup [root ~]# cp sohu.html backup/ [root ~]# cd backup [root backup]# ls sohu.html [root backup]# mv sohu.html sohuindex.html [root backup]# ls sohuindex.html ``
- 文件重命名 - rename。
[root@iZwz97tbgo9lkabnat2lo8Z ~]# rename .htm .html *.htm- 查找文件和查找内容 - find / grep。
``Shell [root@iZwz97tbgo9lkabnat2lo8Z ~]# find / -name ".html" /root/sohu.html /root/backup/sohu_index.html [root@izwz97tbgo9lkabnat2lo8z ~]# find . -atime 7 -type f -print [root@izwz97tbgo9lkabnat2lo8z ~]# find . -type f -size +2k [root@izwz97tbgo9lkabnat2lo8z ~]# find . -type f -name ".swp" -delete [root@iZwz97tbgo9lkabnat2lo8Z ~]# grep "<script>" sohu.html -n 20:<script> [root@iZwz97tbgo9lkabnat2lo8Z ~]# grep -E \<\/?script.*\> sohu.html -n 20:<script> 22:</script> 24:<script src="//statics.itc.cn/web/v3/static/js/es5-shim-08e41cfc3e.min.js"></script> 25:<script src="//statics.itc.cn/web/v3/static/js/es5-sham-1d5fa1124b.min.js"></script> 26:<script src="//statics.itc.cn/web/v3/static/js/html5shiv-21fc8c2ba6.js"></script> 29:<script type="text/javascript"> 52:</script> ... ``
> 说明:grep在搜索字符串时可以使用正则表达式,如果需要使用正则表达式可以用grep -E或者直接使用egrep。 >
- 创建链接和查看链接 - ln / readlink。
``Shell [root@iZwz97tbgo9lkabnat2lo8Z ~]# ls -l sohu.html -rw-r--r-- 1 root root 212131 Jun 20 19:15 sohu.html [root@iZwz97tbgo9lkabnat2lo8Z ~]# ln /root/sohu.html /root/backup/sohubackup [root@iZwz97tbgo9lkabnat2lo8Z ~]# ls -l sohu.html -rw-r--r-- 2 root root 212131 Jun 20 19:15 sohu.html [root@iZwz97tbgo9lkabnat2lo8Z ~]# ln /root/sohu.html /root/backup/sohubackup2 [root@iZwz97tbgo9lkabnat2lo8Z ~]# ls -l sohu.html -rw-r--r-- 3 root root 212131 Jun 20 19:15 sohu.html [root@iZwz97tbgo9lkabnat2lo8Z ~]# ln -s /etc/centos-release sysinfo [root@iZwz97tbgo9lkabnat2lo8Z ~]# ls -l sysinfo lrwxrwxrwx 1 root root 19 Jun 20 19:21 sysinfo -> /etc/centos-release [root@iZwz97tbgo9lkabnat2lo8Z ~]# cat sysinfo CentOS Linux release 7.4.1708 (Core) [root@iZwz97tbgo9lkabnat2lo8Z ~]# cat /etc/centos-release CentOS Linux release 7.4.1708 (Core) ``
> 说明:链接可以分为硬链接和软链接(符号链接)。硬链接可以认为是一个指向文件数据的指针,就像Python中对象的引用计数,每添加一个硬链接,文件的对应链接数就增加1,只有当文件的链接数为0时,文件所对应的存储空间才有可能被其他文件覆盖。我们平常删除文件时其实并没有删除硬盘上的数据,我们删除的只是一个指针,或者说是数据的一条使用记录,所以类似于“文件粉碎机”之类的软件在“粉碎”文件时除了删除文件指针,还会在文件对应的存储区域填入数据来保证文件无法再恢复。软链接类似于Windows系统下的快捷方式,当软链接链接的文件被删除时,软链接也就失效了。 >
- 压缩/解压缩和归档/解归档 - gzip / gunzip / xz。
[root@iZwz97tbgo9lkabnat2lo8Z ~]# wget http://download.redis.io/releases/redis-4.0.10.tar.gz
--2018-06-20 19:29:59--  http://download.redis.io/releases/redis-4.0.10.tar.gz
Resolving download.redis.io (download.redis.io)... 109.74.203.151
Connecting to download.redis.io (download.redis.io)|109.74.203.151|:80... connected.
HTTP request sent, awaiting response... 200 OK
Length: 1738465 (1.7M) [application/x-gzip]
Saving to: ‘redis-4.0.10.tar.gz’
100%[==================================================>] 1,738,465   70.1KB/s   in 74s
2018-06-20 19:31:14 (22.9 KB/s) - ‘redis-4.0.10.tar.gz’ saved [1738465/1738465]
[root@iZwz97tbgo9lkabnat2lo8Z ~]# ls redis*
redis-4.0.10.tar.gz
[root@iZwz97tbgo9lkabnat2lo8Z ~]# gunzip redis-4.0.10.tar.gz
[root@iZwz97tbgo9lkabnat2lo8Z ~]# ls redis*
redis-4.0.10.tar- 归档和解归档 - tar。
[root@iZwz97tbgo9lkabnat2lo8Z ~]# tar -xvf redis-4.0.10.tar
redis-4.0.10/
redis-4.0.10/.gitignore
redis-4.0.10/00-RELEASENOTES
redis-4.0.10/BUGS
redis-4.0.10/CONTRIBUTING
redis-4.0.10/COPYING
redis-4.0.10/INSTALL
redis-4.0.10/MANIFESTO
redis-4.0.10/Makefile
redis-4.0.10/README.md
redis-4.0.10/deps/
redis-4.0.10/deps/Makefile
redis-4.0.10/deps/README.md
...
说明:归档(也称为创建归档)和解归档都使用
tar命令,通常创建归档需要-cvf三个参数,其中c表示创建(create),v表示显示创建归档详情(verbose),f表示指定归档的文件(file);解归档需要加上-xvf参数,其中x表示抽取(extract),其他两个参数跟创建归档相同。
- 将标准输入转成命令行参数 - xargs。
下面的命令会将查找当前路径下的html文件,然后通过xargs将这些文件作为参数传给rm命令,实现查找并删除文件的操作。
[root@iZwz97tbgo9lkabnat2lo8Z ~]# find . -type f -name "*.html" | xargs rm -f下面的命令将a.txt文件中的多行内容变成一行输出到b.txt文件中,其中<表示从a.txt中读取输入,>表示将命令的执行结果输出到b.txt中。
[root@iZwz97tbgo9lkabnat2lo8Z ~]# xargs < a.txt > b.txt说明:这个命令就像上面演示的那样常在管道(实现进程间通信的一种方式)和重定向(重新指定输入输出的位置)操作中用到,后面的内容中会讲到管道操作和输入输出重定向操作。
- 显示文件或目录 - basename / dirname。
- 其他相关工具。
- sort - 对内容排序
- uniq - 去掉相邻重复内容
- tr - 替换指定内容为新内容
- cut / paste - 剪切/黏贴内容
- split - 拆分文件
- file - 判断文件类型
- wc - 统计文件行数、单词数、字节数
- iconv - 编码转换
[root ~]# cat foo.txt
grape
apple
pitaya
[root ~]# cat bar.txt
100
200
300
400
[root ~]# paste foo.txt bar.txt
grape   100
apple   200
pitaya  300
        400
[root ~]# paste foo.txt bar.txt > hello.txt
[root ~]# cut -b 4-8 hello.txt
pe      10
le      20
aya     3
0
[root ~]# cat hello.txt | tr '\t' ','
grape,100
apple,200
pitaya,300
,400
[root ~]# split -l 100 sohu.html hello
[root ~]# wget https://www.baidu.com/img/bd_logo1.png
[root ~]# file bd_logo1.png
bd_logo1.png: PNG image data, 540 x 258, 8-bit colormap, non-interlaced
[root ~]# wc sohu.html
  2979   6355 212527 sohu.html
[root ~]# wc -l sohu.html
2979 sohu.html
[root ~]# wget http://www.qq.com -O qq.html
[root ~]# iconv -f gb2312 -t utf-8 qq.html
管道和重定向
- 管道的使用 - | 。
例子:查找当前目录下文件个数。
``Shell [root ~]# find ./ | wc -l 6152 ``
例子:列出当前路径下的文件和文件夹,给每一项加一个编号。
``Shell [root ~]# ls | cat -n 1 dump.rdb 2 mongodb-3.6.5 3 Python-3.6.5 4 redis-3.2.11 5 redis.conf ``
例子:查找record.log中包含AAA,但不包含BBB的记录的总数
``Shell [root ~]# cat record.log | grep AAA | grep -v BBB | wc -l ``
- 输出重定向和错误重定向 - > / >> / 2 > 。
``Shell [root ~]# cat readme.txt banana apple grape apple grape watermelon pear pitaya [root ~]# cat readme.txt | sort | uniq > result.txt [root ~]# cat result.txt apple banana grape pear pitaya watermelon ``
- 输入重定向 - < 。
``Shell [root ~]# echo 'hello, world!' > hello.txt [root ~]# wall < hello.txt [root ~]# Broadcast message from root (Wed Jun 20 19:43:05 2018): hello, world! [root ~]# echo 'I will show you some code.' >> hello.txt [root ~]# wall < hello.txt [root ~]# Broadcast message from root (Wed Jun 20 19:43:55 2018): hello, world! I will show you some code. ``
- 多重定向 - tee。
下面的命令除了在终端显示命令ls的结果之外,还会追加输出到ls.txt文件中。
``Shell [root ~]# ls | tee -a ls.txt ``
别名
- alias
``Shell [root ~]# alias ll='ls -l' [root ~]# alias frm='rm -rf' [root ~]# ll ... drwxr-xr-x 2 root root 4096 Jun 20 12:52 abc ... [root ~]# frm abc ``
- unalias
``Shell [root ~]# unalias frm [root ~]# frm sohu.html -bash: frm: command not found ``
文本处理
- 字符流编辑器 - sed。
sed是操作、过滤和转换文本内容的工具。假设有一个名为fruit.txt的文件,内容如下所示。
``Shell [root ~]# cat -n fruit.txt 1 banana 2 grape 3 apple 4 watermelon 5 orange ``
接下来,我们在第2行后面添加一个pitaya。
``Shell [root ~]# sed '2a pitaya' fruit.txt banana grape pitaya apple watermelon orange ``
> 注意:刚才的命令和之前我们讲过的很多命令一样并没有改变fruit.txt文件,而是将添加了新行的内容输出到终端中,如果想保存到fruit.txt中,可以使用输出重定向操作。 >
在第2行前面插入一个waxberry。
``Shell [root ~]# sed '2i waxberry' fruit.txt banana waxberry grape apple watermelon orange ``
删除第3行。
``Shell [root ~]# sed '3d' fruit.txt banana grape watermelon orange ``
删除第2行到第4行。
``Shell [root ~]# sed '2,4d' fruit.txt banana orange ``
将文本中的字符a替换为@。
``Shell [root ~]# sed 's#a#@#' fruit.txt b@nana gr@pe @pple w@termelon or@nge ``
将文本中的字符a替换为@,使用全局模式。
``Shell [root ~]# sed 's#a#@#g' fruit.txt b@n@n@ gr@pe @pple w@termelon or@nge ``
- 模式匹配和处理语言 - awk。
awk是一种编程语言,也是Linux系统中处理文本最为强大的工具,它的作者之一和现在的维护者就是之前提到过的Brian Kernighan(ken和dmr最亲密的伙伴)。通过该命令可以从文本中提取出指定的列、用正则表达式从文本中取出我们想要的内容、显示指定的行以及进行统计和运算,总之它非常强大。
假设有一个名为fruit2.txt的文件,内容如下所示。
``Shell [root ~]# cat fruit2.txt 1 banana 120 2 grape 500 3 apple 1230 4 watermelon 80 5 orange 400 ``
显示文件的第3行。
``Shell [root ~]# awk 'NR==3' fruit2.txt 3 apple 1230 ``
显示文件的第2列。
``Shell [root ~]# awk '{print $2}' fruit2.txt banana grape apple watermelon orange ``
显示文件的最后一列。
``Shell [root ~]# awk '{print $NF}' fruit2.txt 120 500 1230 80 400 ``
输出末尾数字大于等于300的行。
``Shell [root ~]# awk '{if($3 >= 300) {print $0}}' fruit2.txt 2 grape 500 3 apple 1230 5 orange 400 ``
上面展示的只是awk命令的冰山一角,更多的内容留给读者自己在实践中去探索。
用户管理
- 创建和删除用户 - useradd / userdel。
``Shell [root home]# useradd hellokitty [root home]# userdel hellokitty ``
-d- 创建用户时为用户指定用户主目录-g- 创建用户时指定用户所属的用户组
- 创建和删除用户组 - groupadd / groupdel。
> 说明:用户组主要是为了方便对一个组里面所有用户的管理。 >
- 修改密码 - passwd。
``Shell [root ~]# passwd hellokitty New password: Retype new password: passwd: all authentication tokens updated successfully. ``
> 说明:输入密码和确认密码没有回显且必须一气呵成的输入完成(不能使用退格键),密码和确认密码需要一致。如果使用passwd命令时没有指定命令作用的对象,则表示要修改当前用户的密码。如果想批量修改用户密码,可以使用chpasswd命令。 >
-l/-u- 锁定/解锁用户。-d- 清除用户密码。-e- 设置密码立即过期,用户登录时会强制要求修改密码。-i- 设置密码过期多少天以后禁用该用户。
- 查看和修改密码有效期 - chage。
设置hellokitty用户100天后必须修改密码,过期前15天通知该用户,过期后7天禁用该用户。
``Shell chage -M 100 -W 15 -I 7 hellokitty ``
- 切换用户 - su。
``Shell [root ~]# su hellokitty [hellokitty root]$ ``
- 以管理员身份执行命令 - sudo。
``Shell [hellokitty ~]$ ls /root ls: cannot open directory /root: Permission denied [hellokitty ~]$ sudo ls /root [sudo] password for hellokitty: ``
> 说明:如果希望用户能够以管理员身份执行命令,用户必须要出现在sudoers名单中,sudoers文件在 /etc目录下,如果希望直接编辑该文件也可以使用下面的命令。 >
- 编辑sudoers文件 - visudo。
这里使用的编辑器是vi,关于vi的知识在后面有讲解。该文件的部分内容如下所示:
``` ## Allow root to run any commands anywhere root ALL=(ALL) ALL
## Allows members of the 'sys' group to run networking, software, ## service management apps and more. # %sys ALL = NETWORKING, SOFTWARE, SERVICES, STORAGE, DELEGATING, PROCESSES, LOCATE, DRIVERS ## Allows people in group wheel to run all commands %wheel ALL=(ALL) ALL
## Same thing without a password # %wheel ALL=(ALL) NOPASSWD: ALL
## Allows members of the users group to mount and unmount the ## cdrom as root # %users ALL=/sbin/mount /mnt/cdrom, /sbin/umount /mnt/cdrom
## Allows members of the users group to shutdown this system # %users localhost=/sbin/shutdown -h now ```
- 显示用户与用户组的信息 - id。
- 给其他用户发消息 -write / wall。
发送方:
``Shell [root ~]# write hellokitty Dinner is on me. Call me at 6pm. ``
接收方:
``Shell [hellokitty ~]$ Message from root on pts/0 at 17:41 ... Dinner is on me. Call me at 6pm. EOF ``
- 查看/设置是否接收其他用户发送的消息 - mesg。
[hellokitty ~]$ mesg
is y
[hellokitty ~]$ mesg n
[hellokitty ~]$ mesg
is n
文件系统
文件和路径
- 命名规则:文件名的最大长度与文件系统类型有关,一般情况下,文件名不应该超过255个字符,虽然绝大多数的字符都可以用于文件名,但是最好使用英文大小写字母、数字、下划线、点这样的符号。文件名中虽然可以使用空格,但应该尽可能避免使用空格,否则在输入文件名时需要用将文件名放在双引号中或者通过
\对空格进行转义。 - 扩展名:在Linux系统下文件的扩展名是可选的,但是使用扩展名有助于对文件内容的理解。有些应用程序要通过扩展名来识别文件,但是更多的应用程序并不依赖文件的扩展名,就像
file命令在识别文件时并不是依据扩展名来判定文件的类型。 - 隐藏文件:以点开头的文件在Linux系统中是隐藏文件(不可见文件)。
目录结构
- /bin - 基本命令的二进制文件。
- /boot - 引导加载程序的静态文件。
- /dev - 设备文件。
- /etc - 配置文件。
- /home - 普通用户主目录的父目录。
- /lib - 共享库文件。
- /lib64 - 共享64位库文件。
- /lost+found - 存放未链接文件。
- /media - 自动识别设备的挂载目录。
- /mnt - 临时挂载文件系统的挂载点。
- /opt - 可选插件软件包安装位置。
- /proc - 内核和进程信息。
- /root - 超级管理员用户主目录。
- /run - 存放系统运行时需要的东西。
- /sbin - 超级用户的二进制文件。
- /sys - 设备的伪文件系统。
- /tmp - 临时文件夹。
- /usr - 用户应用目录。
- /var - 变量数据目录。
访问权限
- chmod - 改变文件模式比特。
``Shell [root ~]# ls -l ... -rw-r--r-- 1 root root 211878 Jun 19 16:06 sohu.html ... [root ~]# chmod g+w,o+w sohu.html [root ~]# ls -l ... -rw-rw-rw- 1 root root 211878 Jun 19 16:06 sohu.html ... [root ~]# chmod 644 sohu.html [root ~]# ls -l ... -rw-r--r-- 1 root root 211878 Jun 19 16:06 sohu.html ... ``
> 说明:通过上面的例子可以看出,用chmod改变文件模式比特有两种方式:一种是字符设定法,另一种是数字设定法。除了chmod之外,可以通过umask来设定哪些权限将在新文件的默认权限中被删除。 >
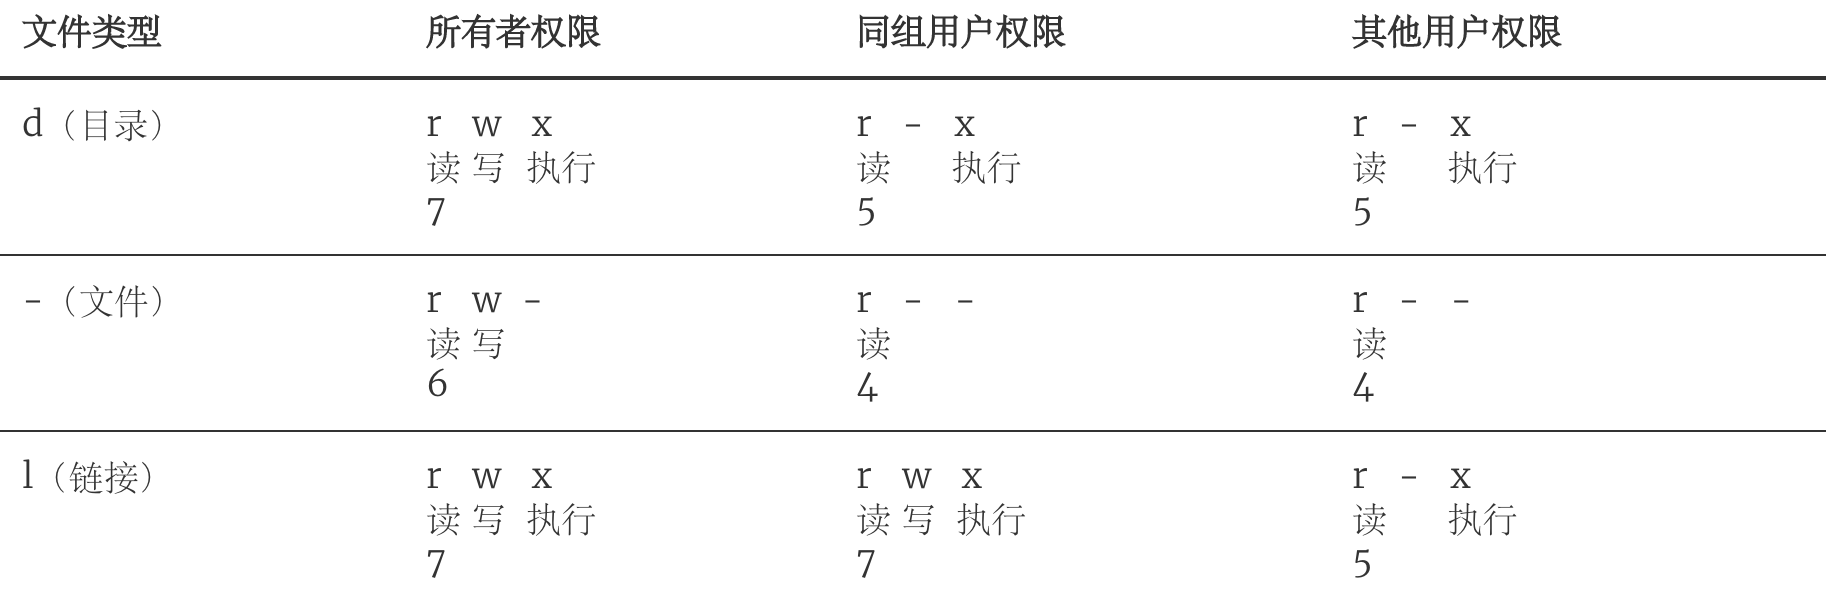
长格式查看目录或文件时显示结果及其对应权限的数值如下表所示。
- chown - 改变文件所有者。
``Shell [root ~]# ls -l ... -rw-r--r-- 1 root root 54 Jun 20 10:06 readme.txt ... [root ~]# chown hellokitty readme.txt [root ~]# ls -l ... -rw-r--r-- 1 hellokitty root 54 Jun 20 10:06 readme.txt ... ``
- chgrp - 改变用户组。
磁盘管理
- 列出文件系统的磁盘使用状况 - df。
``Shell [root ~]# df -h Filesystem Size Used Avail Use% Mounted on /dev/vda1 40G 5.0G 33G 14% / devtmpfs 486M 0 486M 0% /dev tmpfs 497M 0 497M 0% /dev/shm tmpfs 497M 356K 496M 1% /run tmpfs 497M 0 497M 0% /sys/fs/cgroup tmpfs 100M 0 100M 0% /run/user/0 ``
- 磁盘分区表操作 - fdisk。
``Shell [root ~]# fdisk -l Disk /dev/vda: 42.9 GB, 42949672960 bytes, 83886080 sectors Units = sectors of 1 512 = 512 bytes Sector size (logical/physical): 512 bytes / 512 bytes I/O size (minimum/optimal): 512 bytes / 512 bytes Disk label type: dos Disk identifier: 0x000a42f4 Device Boot Start End Blocks Id System /dev/vda1 2048 83884031 41940992 83 Linux Disk /dev/vdb: 21.5 GB, 21474836480 bytes, 41943040 sectors Units = sectors of 1 * 512 = 512 bytes Sector size (logical/physical): 512 bytes / 512 bytes I/O size (minimum/optimal): 512 bytes / 512 bytes ``
- 磁盘分区工具 - parted。
- 格式化文件系统 - mkfs。
``Shell [root ~]# mkfs -t ext4 -v /dev/sdb ``
-t- 指定文件系统的类型。-c- 创建文件系统时检查磁盘损坏情况。-v- 显示详细信息。
- 文件系统检查 - fsck。
- 转换或拷贝文件 - dd。
- 挂载/卸载 - mount / umount。
- 创建/激活/关闭交换分区 - mkswap / swapon / swapoff。
说明:执行上面这些命令会带有一定的风险,如果不清楚这些命令的用法,最好不用随意使用,在使用的过程中,最好对照参考资料进行操作,并在操作前确认是否要这么做。
编辑器 - vim
- 启动vim。可以通过
vi或vim命令来启动vim,启动时可以指定文件名来打开一个文件,如果没有指定文件名,也可以在保存的时候指定文件名。
``Shell [root ~]# vim guess.py ``
- 命令模式、编辑模式和末行模式:启动vim进入的是命令模式(也称为Normal模式),在命令模式下输入英文字母
i会进入编辑模式(Insert模式),屏幕下方出现-- INSERT --提示;在编辑模式下按下Esc会回到命令模式,此时如果输入英文:会进入末行模式,在末行模式下输入q!可以在不保存当前工作的情况下强行退出vim;在命令模式下输入v会进入可视模式(Visual模式),可以用光标选择一个区域再完成对应的操作。 - 保存和退出vim:在命令模式下输入
:进入末行模式,输入wq可以实现保存退出;如果想放弃编辑的内容输入q!强行退出,这一点刚才已经提到过了;在命令模式下也可以直接输入ZZ实现保存退出。如果只想保存文件不退出,那么可以在末行模式下输入w;可以在w后面输入空格再指定要保存的文件名。 - 光标操作。
- 在命令模式下可以通过
h、j、k、l来控制光标向左、下、上、右的方向移动,可以在字母前输入数字来表示移动的距离,例如:10h表示向左移动10个字符。 - 在命令模式下可以通过
Ctrl+y和Ctrl+e来实现向上、向下滚动一行文本的操作,可以通过Ctrl+f和Ctrl+b来实现向前和向后翻页的操作。 - 在命令模式下可以通过输入英文字母
G将光标移到文件的末尾,可以通过gg将光标移到文件的开始,也可以通过在G前输入数字来将光标移动到指定的行。
- 文本操作。
- 删除:在命令模式下可以用
dd来删除整行;可以在dd前加数字来指定删除的行数;可以用d$来实现删除从光标处删到行尾的操作,也可以通过d0来实现从光标处删到行首的操作;如果想删除一个单词,可以使用dw;如果要删除全文,可以在输入:%d(其中:用来从命令模式进入末行模式)。 - 复制和粘贴:在命令模式下可以用
yy来复制整行;可以在yy前加数字来指定复制的行数;可以通过p将复制的内容粘贴到光标所在的地方。 - 撤销和恢复:在命令模式下输入
u可以撤销之前的操作;通过Ctrl+r可以恢复被撤销的操作。 - 对内容进行排序:在命令模式下输入
%!sort。
- 查找和替换。
- 查找操作需要输入
/进入末行模式并提供正则表达式来匹配与之对应的内容,例如:/doc.*\.,输入n来向前搜索,也可以输入N来向后搜索。 - 替换操作需要输入
:进入末行模式并指定搜索的范围、正则表达式以及替换后的内容和匹配选项,例如::1,$s/doc.*/hello/gice,其中: g- global:全局匹配。i- ignore case:忽略大小写匹配。c- confirm:替换时需要确认。e- error:忽略错误。
- 参数设定:在输入
:进入末行模式后可以对vim进行设定。
- 设置Tab键的空格数:
set ts=4 - 设置显示/不显示行号:
set nu/set nonu - 设置启用/关闭高亮语法:
syntax on/syntax off - 设置显示标尺(光标所在的行和列):
set ruler - 设置启用/关闭搜索结果高亮:
set hls/set nohls
> 说明:如果希望上面的这些设定在每次启动vim时都能自动生效,需要将这些设定写到用户主目录下的.vimrc文件中。 >
- 高级技巧
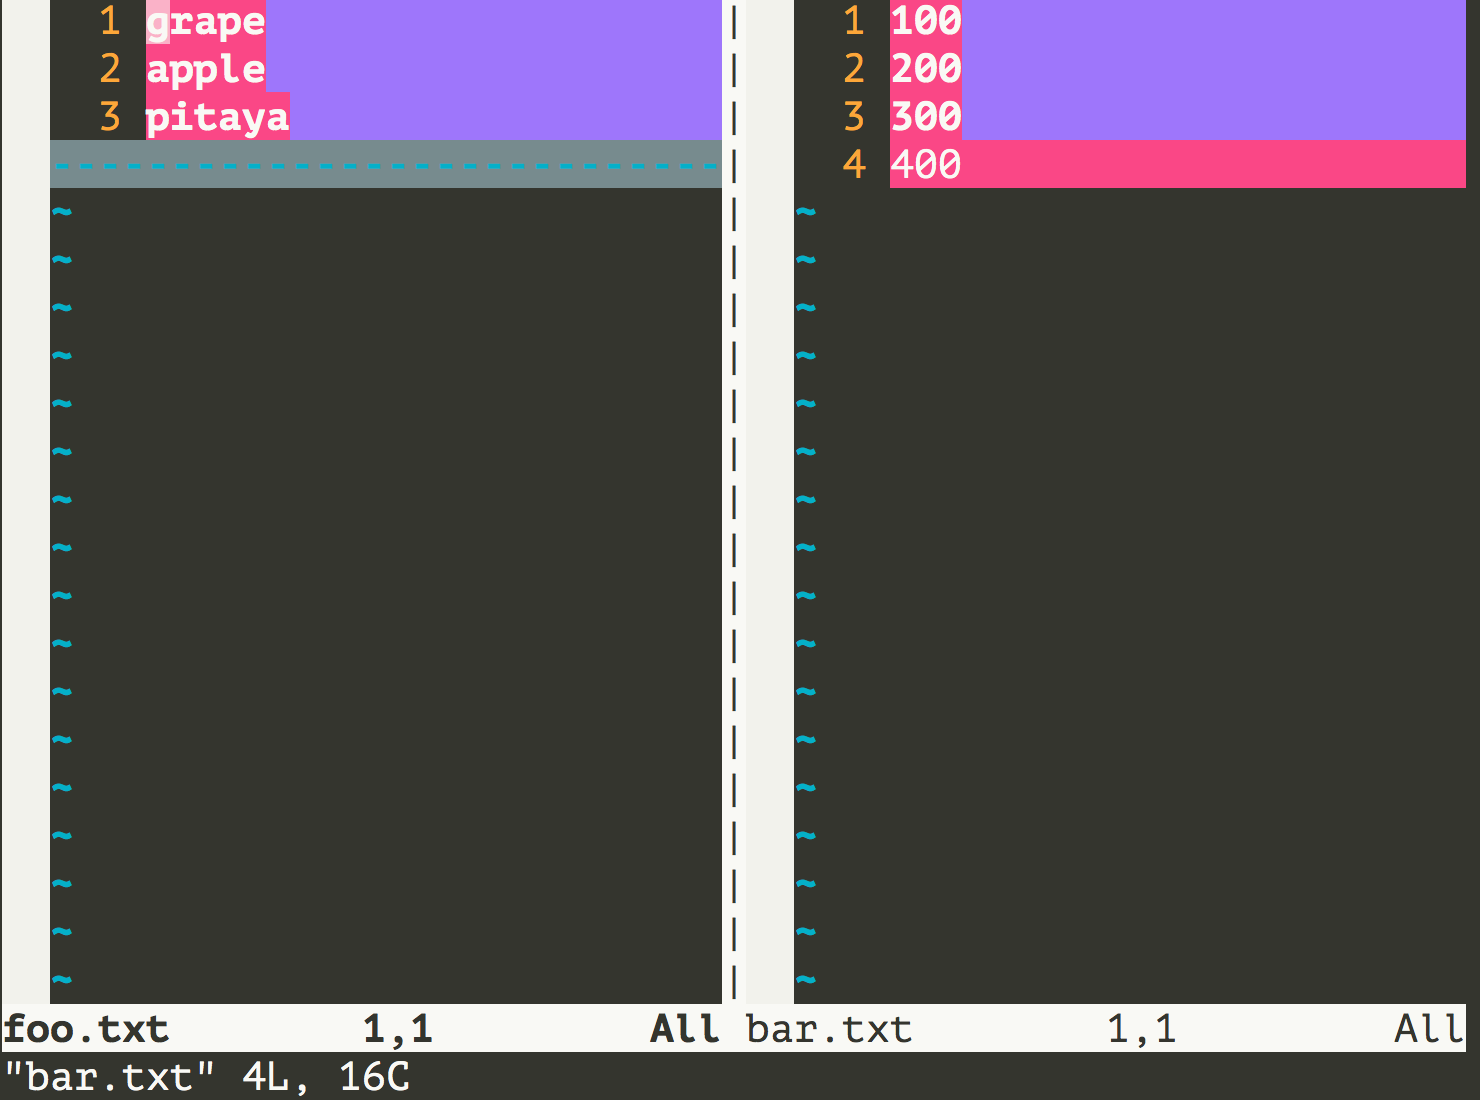
- 比较多个文件。
``Shell [root ~]# vim -d foo.txt bar.txt ``
- 打开多个文件。
``Shell [root ~]# vim foo.txt bar.txt hello.txt ``
启动vim后只有一个窗口显示的是foo.txt,可以在末行模式中输入ls查看到打开的三个文件,也可以在末行模式中输入b <num>来显示另一个文件,例如可以用:b 2将bar.txt显示出来,可以用:b 3将hello.txt显示出来。
- 拆分和切换窗口。
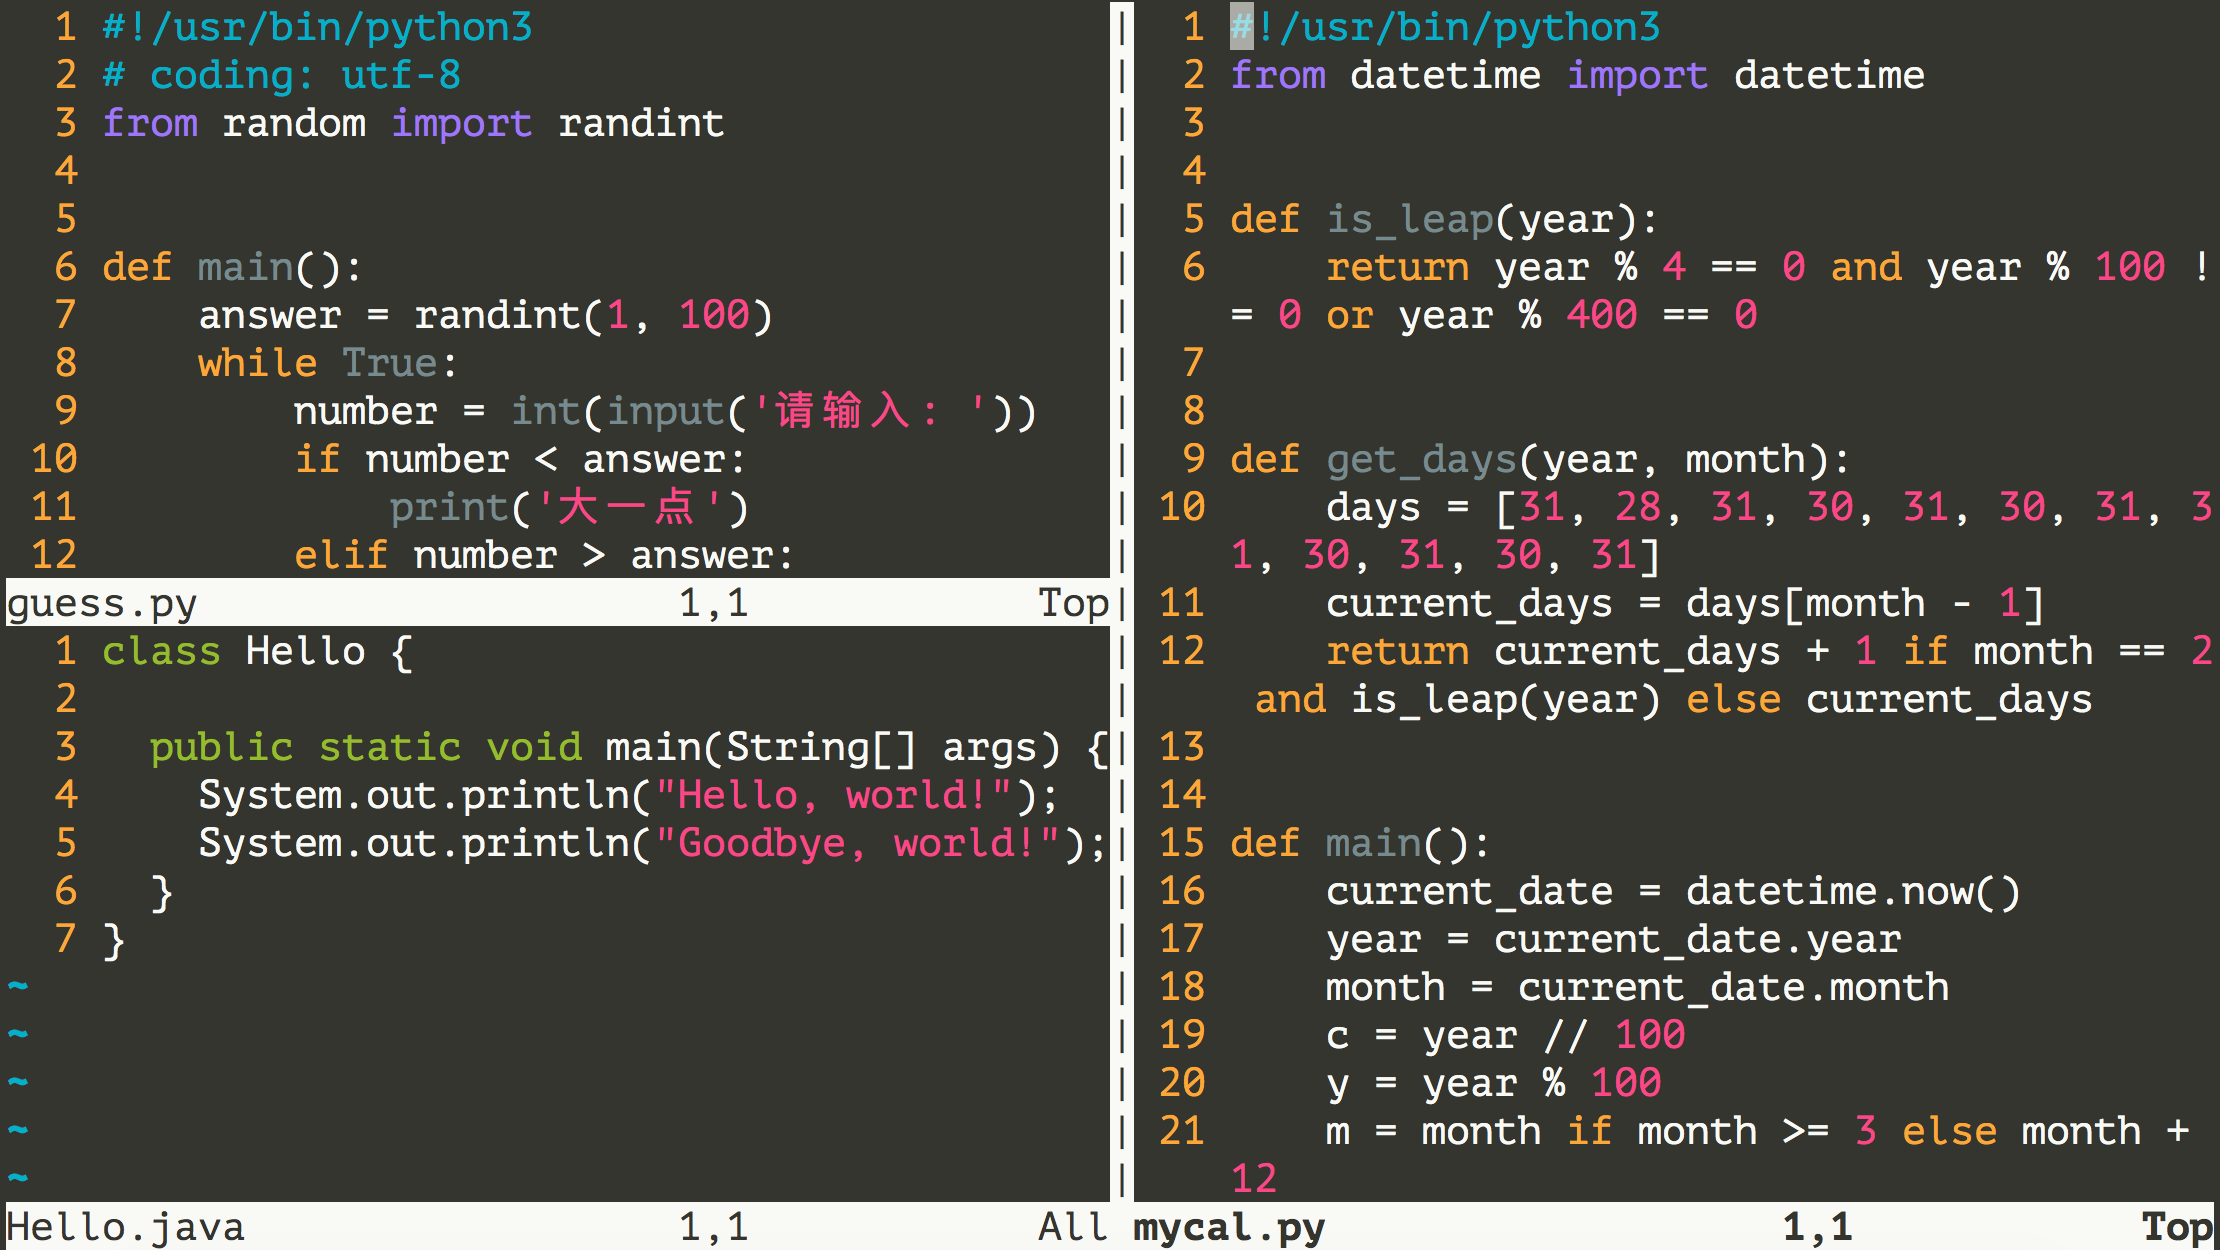
可以在末行模式中输入sp或vs来实现对窗口的水平或垂直拆分,这样我们就可以同时打开多个编辑窗口,通过按两次Ctrl+w就可以实现编辑窗口的切换,在一个窗口中执行退出操作只会关闭对应的窗口,其他的窗口继续保留。
- 映射快捷键:在vim下可以将一些常用操作映射为快捷键来提升工作效率。
- 例子1:在命令模式下输入
F4执行从第一行开始删除10000行代码的操作。
:map <F4> gg10000dd。
例子2:在编辑模式下输入main直接补全为if name == 'main__':。
:inoremap main if name == 'main__':
> 说明:上面例子2的inoremap中的i表示映射的键在编辑模式使用, nore表示不要递归,这一点非常重要,否则如果键对应的内容中又出现键本身,就会引发递归(相当于进入了死循环)。如果希望映射的快捷键每次启动vim时都能生效,需要将映射写到用户主目录下的.vimrc文件中。 >
- 录制宏。
- 在命令模式下输入
qa开始录制宏(其中a是寄存器的名字,也可以是其他英文字母或0-9的数字)。 - 执行你的操作(光标操作、编辑操作等),这些操作都会被录制下来。
- 如果录制的操作已经完成了,按
q结束录制。 - 通过
@a(a是刚才使用的寄存器的名字)播放宏,如果要多次执行宏可以在前面加数字,例如100@a表示将宏播放100次。 - 可以试一试下面的例子来体验录制宏的操作,该例子来源于Harttle Land网站,该网站上提供了很多关于vim的使用技巧,有兴趣的可以了解一下。
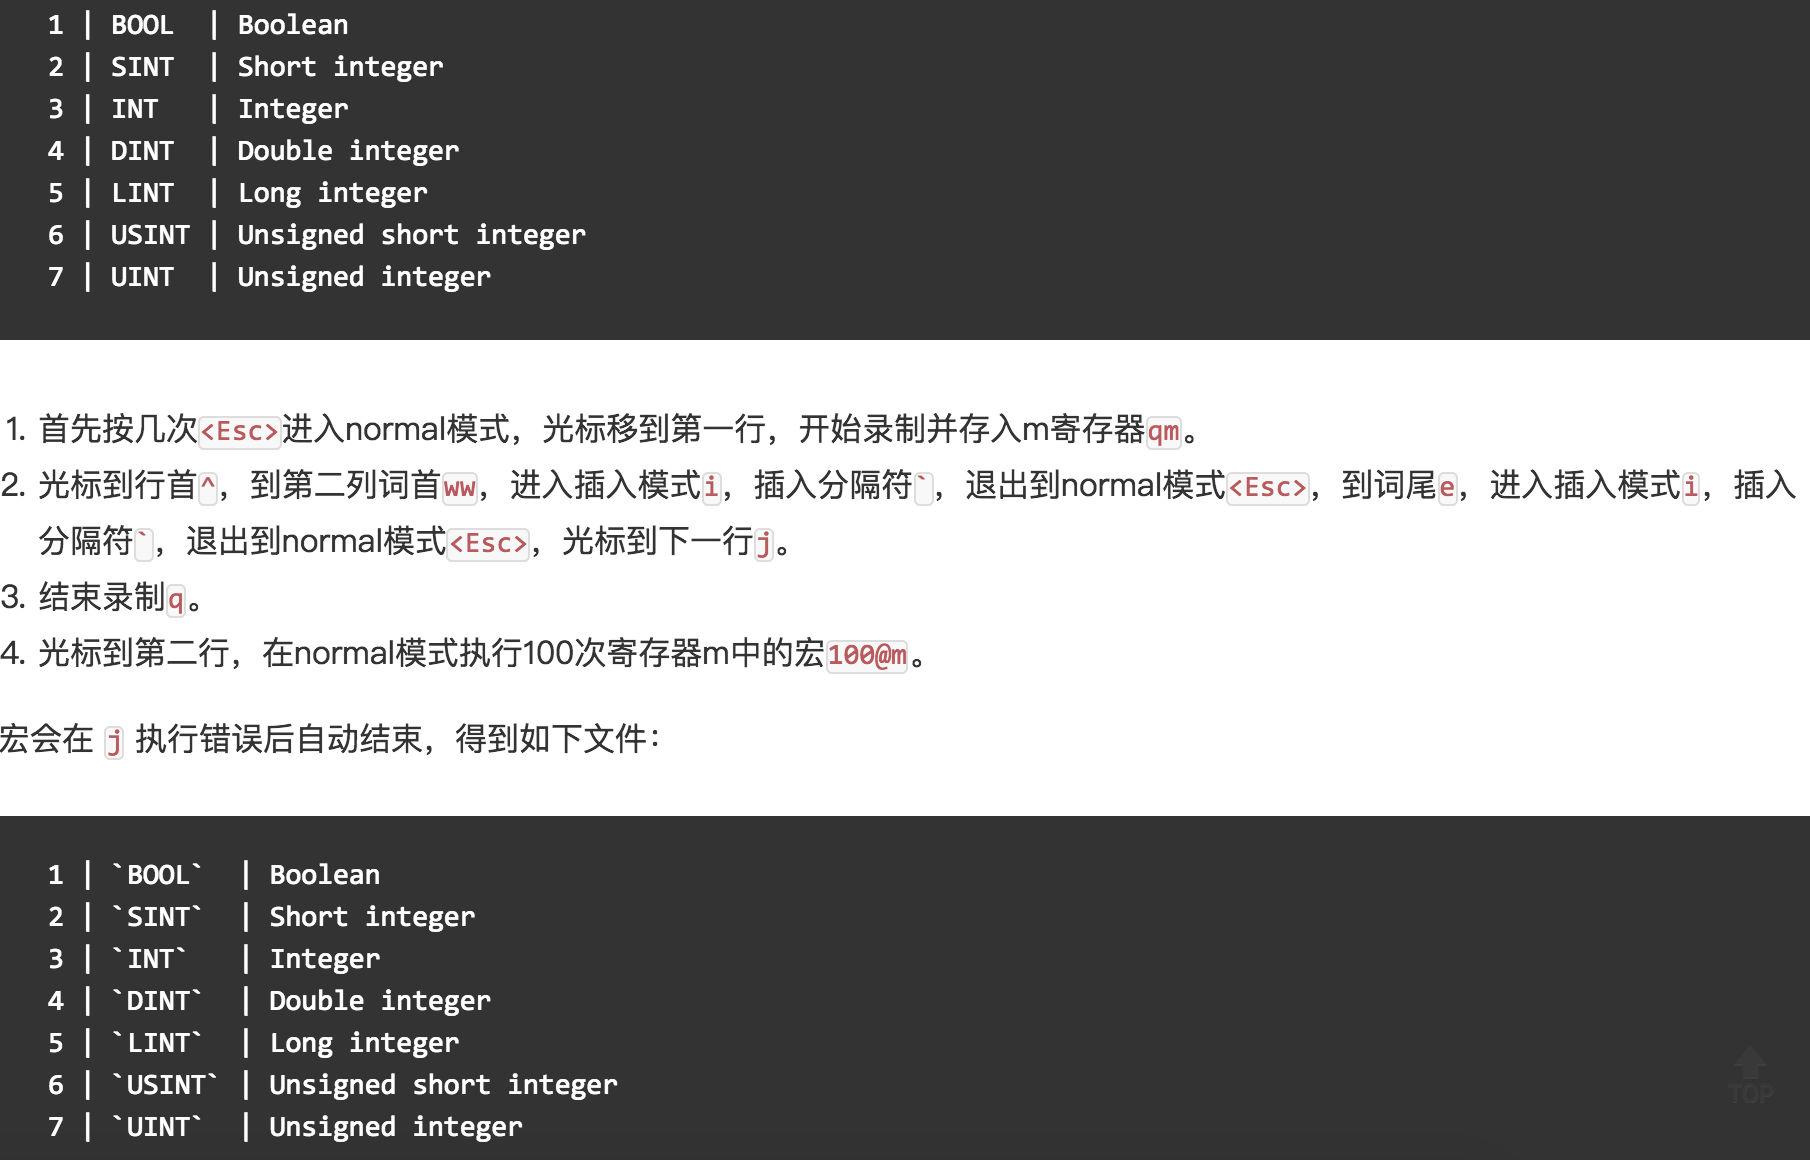
软件安装和配置
使用包管理工具
- yum - Yellowdog Updater Modified。
yum search:搜索软件包,例如yum search nginx。yum list installed:列出已经安装的软件包,例如yum list installed | grep zlib。yum install:安装软件包,例如yum install nginx。yum remove:删除软件包,例如yum remove nginx。yum update:更新软件包,例如yum update可以更新所有软件包,而yum update tar只会更新tar。yum check-update:检查有哪些可以更新的软件包。yum info:显示软件包的相关信息,例如yum info nginx。
- rpm - Redhat Package Manager。
- 安装软件包:
rpm -ivh <packagename>.rpm。 - 移除软件包:
rpm -e <packagename>。 - 查询软件包:
rpm -qa,例如可以用rpm -qa | grep mysql来检查是否安装了MySQL相关的软件包。
下面以Nginx为例,演示如何使用yum安装软件。
[root ~]# yum -y install nginx
...
Installed:
  nginx.x86_64 1:1.12.2-2.el7
Dependency Installed:
  nginx-all-modules.noarch 1:1.12.2-2.el7
  nginx-mod-http-geoip.x86_64 1:1.12.2-2.el7
  nginx-mod-http-image-filter.x86_64 1:1.12.2-2.el7
  nginx-mod-http-perl.x86_64 1:1.12.2-2.el7
  nginx-mod-http-xslt-filter.x86_64 1:1.12.2-2.el7
  nginx-mod-mail.x86_64 1:1.12.2-2.el7
  nginx-mod-stream.x86_64 1:1.12.2-2.el7
Complete!
[root ~]# yum info nginx
Loaded plugins: fastestmirror
Loading mirror speeds from cached hostfile
Installed Packages
Name        : nginx
Arch        : x86_64
Epoch       : 1
Version     : 1.12.2
Release     : 2.el7
Size        : 1.5 M
Repo        : installed
From repo   : epel
Summary     : A high performance web server and reverse proxy server
URL         : http://nginx.org/
License     : BSD
Description : Nginx is a web server and a reverse proxy server for HTTP, SMTP, POP3 and
            : IMAP protocols, with a strong focus on high concurrency, performance and low
            : memory usage.
[root ~]# nginx -v
nginx version: nginx/1.12.2
移除Nginx。
[root ~]# yum -y remove nginx下面以MySQL为例,演示如何使用rpm安装软件。要安装MySQL需要先到MySQL官方网站下载对应的RPM文件,当然要选择和你使用的Linux系统对应的版本。MySQL现在是Oracle公司旗下的产品,在MySQL被收购后,MySQL的作者重新制作了一个MySQL的分支MariaDB,可以通过yum进行安装。
[root mysql]# ls
mysql-community-client-5.7.22-1.el7.x86_64.rpm
mysql-community-common-5.7.22-1.el7.x86_64.rpm
mysql-community-libs-5.7.22-1.el7.x86_64.rpm
mysql-community-server-5.7.22-1.el7.x86_64.rpm
[root mysql]# yum -y remove mariadb-libs
[root mysql]# yum -y install libaio
[root mysql]#rpm -ivh mysql-community-common-5.7.26-1.el7.x86_64.rpm
...
[root mysql]#rpm -ivh mysql-community-libs-5.7.26-1.el7.x86_64.rpm
...
[root mysql]#rpm -ivh mysql-community-client-5.7.26-1.el7.x86_64.rpm
...
[root mysql]#rpm -ivh mysql-community-server-5.7.26-1.el7.x86_64.rpm
...说明:由于MySQL和MariaDB的底层依赖库是有冲突的,所以上面我们首先用
yum移除了名为mariadb-libs的依赖库并安装了名为libaio支持异步I/O操作的依赖库。关于MySQL和MariaDB之间的关系,可以阅读维基百科上关于MariaDB的介绍。
移除安装的MySQL。
[root ~]# rpm -qa | grep mysql | xargs rpm -e下载解压配置环境变量
下面以安装MongoDB为例,演示这类软件应该如何安装。
[root ~]# wget https://fastdl.mongodb.org/linux/mongodb-linux-x86_64-rhel70-3.6.5.tgz
--2018-06-21 18:32:53--  https://fastdl.mongodb.org/linux/mongodb-linux-x86_64-rhel70-3.6.5.tgz
Resolving fastdl.mongodb.org (fastdl.mongodb.org)... 52.85.83.16, 52.85.83.228, 52.85.83.186, ...
Connecting to fastdl.mongodb.org (fastdl.mongodb.org)|52.85.83.16|:443... connected.
HTTP request sent, awaiting response... 200 OK
Length: 100564462 (96M) [application/x-gzip]
Saving to: ‘mongodb-linux-x86_64-rhel70-3.6.5.tgz’
100%[==================================================>] 100,564,462  630KB/s   in 2m 9s
2018-06-21 18:35:04 (760 KB/s) - ‘mongodb-linux-x86_64-rhel70-3.6.5.tgz’ saved [100564462/100564462]
[root ~]# gunzip mongodb-linux-x86_64-rhel70-3.6.5.tgz
[root ~]# tar -xvf mongodb-linux-x86_64-rhel70-3.6.5.tar
mongodb-linux-x86_64-rhel70-3.6.5/README
mongodb-linux-x86_64-rhel70-3.6.5/THIRD-PARTY-NOTICES
mongodb-linux-x86_64-rhel70-3.6.5/MPL-2
mongodb-linux-x86_64-rhel70-3.6.5/GNU-AGPL-3.0
mongodb-linux-x86_64-rhel70-3.6.5/bin/mongodump
mongodb-linux-x86_64-rhel70-3.6.5/bin/mongorestore
mongodb-linux-x86_64-rhel70-3.6.5/bin/mongoexport
mongodb-linux-x86_64-rhel70-3.6.5/bin/mongoimport
mongodb-linux-x86_64-rhel70-3.6.5/bin/mongostat
mongodb-linux-x86_64-rhel70-3.6.5/bin/mongotop
mongodb-linux-x86_64-rhel70-3.6.5/bin/bsondump
mongodb-linux-x86_64-rhel70-3.6.5/bin/mongofiles
mongodb-linux-x86_64-rhel70-3.6.5/bin/mongoreplay
mongodb-linux-x86_64-rhel70-3.6.5/bin/mongoperf
mongodb-linux-x86_64-rhel70-3.6.5/bin/mongod
mongodb-linux-x86_64-rhel70-3.6.5/bin/mongos
mongodb-linux-x86_64-rhel70-3.6.5/bin/mongo
mongodb-linux-x86_64-rhel70-3.6.5/bin/install_compass
[root ~]# vim .bash_profile
...
PATH=$PATH:$HOME/bin:$HOME/mongodb-linux-x86_64-rhel70-3.6.5/bin
export PATH
...
[root ~]# source .bash_profile
[root ~]# mongod --version
db version v3.6.5
git version: a20ecd3e3a174162052ff99913bc2ca9a839d618
OpenSSL version: OpenSSL 1.0.1e-fips 11 Feb 2013
allocator: tcmalloc
modules: none
build environment:
    distmod: rhel70
    distarch: x86_64
    target_arch: x86_64
[root ~]# mongo --version
MongoDB shell version v3.6.5
git version: a20ecd3e3a174162052ff99913bc2ca9a839d618
OpenSSL version: OpenSSL 1.0.1e-fips 11 Feb 2013
allocator: tcmalloc
modules: none
build environment:
    distmod: rhel70
    distarch: x86_64
target_arch: x86_64说明:当然也可以通过yum来安装MongoDB,具体可以参照官方网站上给出的说明。
源代码构建安装
- 安装Python 3.6。
``Shell [root ~]# yum install gcc [root ~]# wget https://www.python.org/ftp/python/3.6.5/Python-3.6.5.tgz [root ~]# gunzip Python-3.6.5.tgz [root ~]# tar -xvf Python-3.6.5.tar [root ~]# cd Python-3.6.5 [root ~]# ./configure --prefix=/usr/local/python36 --enable-optimizations [root ~]# yum -y install zlib-devel bzip2-devel openssl-devel ncurses-devel sqlite-devel readline-devel tk-devel gdbm-devel db4-devel libpcap-devel xz-devel [root ~]# make && make install ... [root ~]# ln -s /usr/local/python36/bin/python3.6 /usr/bin/python3 [root ~]# python3 --version Python 3.6.5 [root ~]# python3 -m pip install -U pip [root ~]# pip3 --version ``
> 说明:上面在安装好Python之后还需要注册PATH环境变量,将Python安装路径下bin文件夹的绝对路径注册到PATH环境变量中。注册环境变量可以修改用户主目录下的.bash_profile或者/etc目录下的profile文件,二者的区别在于前者相当于是用户环境变量,而后者相当于是系统环境变量。 >
- 安装Redis-3.2.12。
``Shell [root ~]# wget http://download.redis.io/releases/redis-3.2.12.tar.gz [root ~]# gunzip redis-3.2.12.tar.gz [root ~]# tar -xvf redis-3.2.12.tar [root ~]# cd redis-3.2.12 [root ~]# make && make install [root ~]# redis-server --version Redis server v=3.2.12 sha=00000000:0 malloc=jemalloc-4.0.3 bits=64 build=5bc5cd3c03d6ceb6 [root ~]# redis-cli --version redis-cli 3.2.12 ``
配置服务
我们可以Linux系统下安装和配置各种服务,也就是说我们可以把Linux系统打造成数据库服务器、Web服务器、缓存服务器、文件服务器、消息队列服务器等等。Linux下的大多数服务都被设置为守护进程(驻留在系统后台运行,但不会因为服务还在运行而导致Linux无法停止运行),所以我们安装的服务通常名字后面都有一个字母d,它是英文单词daemon的缩写,例如:防火墙服务叫firewalld,我们之前安装的MySQL服务叫mysqld,Apache服务器叫httpd等。在安装好服务之后,可以使用systemctl命令或service命令来完成对服务的启动、停止等操作,具体操作如下所示。
- 启动防火墙服务。
``Shell [root ~]# systemctl start firewalld ``
- 终止防火墙服务。
``Shell [root ~]# systemctl stop firewalld ``
- 重启防火墙服务。
``Shell [root ~]# systemctl restart firewalld ``
- 查看防火墙服务状态。
``Shell [root ~]# systemctl status firewalld ``
- 设置/禁用防火墙服务开机自启。
``Shell [root ~]# systemctl enable firewalld Created symlink from /etc/systemd/system/dbus-org.fedoraproject.FirewallD1.service to /usr/lib/systemd/system/firewalld.service. Created symlink from /etc/systemd/system/multi-user.target.wants/firewalld.service to /usr/lib/systemd/system/firewalld.service. [root ~]# systemctl disable firewalld Removed symlink /etc/systemd/system/multi-user.target.wants/firewalld.service. Removed symlink /etc/systemd/system/dbus-org.fedoraproject.FirewallD1.service. ``
计划任务
- 在指定的时间执行命令。
- at - 将任务排队,在指定的时间执行。
- atq - 查看待执行的任务队列。
- atrm - 从队列中删除待执行的任务。
指定3天以后下午5点要执行的任务。
``Shell [root ~]# at 5pm+3days at> rm -f /root/*.html at> <EOT> job 9 at Wed Jun 5 17:00:00 2019 ``
查看待执行的任务队列。
``Shell [root ~]# atq 9 Wed Jun 5 17:00:00 2019 a root ``
从队列中删除指定的任务。
``Shell [root ~]$ atrm 9 ``
- 计划任务表 - crontab。
```Shell [root ~]# crontab -e
- echo "hello, world!" >> /root/hello.txt
59 23 rm -f /root/.log ```
> 说明:输入crontab -e命令会打开vim来编辑Cron表达式并指定触发的任务,上面我们定制了两个计划任务,一个是每分钟向/root目录下的hello.txt中追加输出hello, world!;另一个是每天23时59分执行删除/root目录下以log为后缀名的文件。如果不知道Cron表达式如何书写,可以参照/etc/crontab文件中的提示(下面会讲到)或者用搜索引擎找一下“Cron表达式在线生成器”来生成Cron表达式。 >
和crontab相关的文件在/etc目录下,通过修改/etc目录下的crontab文件也能够定制计划任务。
``Shell [root ~]# cd /etc [root etc]# ls -l | grep cron -rw-------. 1 root root 541 Aug 3 2017 anacrontab drwxr-xr-x. 2 root root 4096 Mar 27 11:56 cron.d drwxr-xr-x. 2 root root 4096 Mar 27 11:51 cron.daily -rw-------. 1 root root 0 Aug 3 2017 cron.deny drwxr-xr-x. 2 root root 4096 Mar 27 11:50 cron.hourly drwxr-xr-x. 2 root root 4096 Jun 10 2014 cron.monthly -rw-r--r-- 1 root root 493 Jun 23 15:09 crontab drwxr-xr-x. 2 root root 4096 Jun 10 2014 cron.weekly [root etc]# vim crontab 1 SHELL=/bin/bash 2 PATH=/sbin:/bin:/usr/sbin:/usr/bin 3 MAILTO=root 4 5 # For details see man 4 crontabs 6 7 # Example of job definition: 8 # .---------------- minute (0 - 59) 9 # | .------------- hour (0 - 23) 10 # | | .---------- day of month (1 - 31) 11 # | | | .------- month (1 - 12) OR jan,feb,mar,apr ... 12 # | | | | .---- day of week (0 - 6) (Sunday=0 or 7) OR sun,mon,tue,wed,thu,fri,sat 13 # | | | | | 14 # * user-name command to be executed ``
网络访问和管理
- 安全远程连接 - ssh。
``Shell [root ~]$ ssh root@120.77.222.217 The authenticity of host '120.77.222.217 (120.77.222.217)' can't be established. ECDSA key fingerprint is SHA256:BhUhykv+FvnIL03I9cLRpWpaCxI91m9n7zBWrcXRa8w. ECDSA key fingerprint is MD5:cc:85:e9:f0:d7:07:1a:26:41:92:77:6b:7f:a0:92:65. Are you sure you want to continue connecting (yes/no)? yes Warning: Permanently added '120.77.222.217' (ECDSA) to the list of known hosts. root@120.77.222.217's password: ``
- 通过网络获取资源 - wget。
- -b 后台下载模式
- -O 下载到指定的目录
- -r 递归下载
- 发送和接收邮件 - mail。
- 网络配置工具(旧) - ifconfig。
``Shell [root ~]# ifconfig eth0 eth0: flags=4163<UP,BROADCAST,RUNNING,MULTICAST> mtu 1500 inet 172.18.61.250 netmask 255.255.240.0 broadcast 172.18.63.255 ether 00:16:3e:02:b6:46 txqueuelen 1000 (Ethernet) RX packets 1067841 bytes 1296732947 (1.2 GiB) RX errors 0 dropped 0 overruns 0 frame 0 TX packets 409912 bytes 43569163 (41.5 MiB) TX errors 0 dropped 0 overruns 0 carrier 0 collisions ``
- 网络配置工具(新) - ip。
``Shell [root ~]# ip address 1: lo: <LOOPBACK,UP,LOWERUP> mtu 65536 qdisc noqueue state UNKNOWN qlen 1 link/loopback 00:00:00:00:00:00 brd 00:00:00:00:00:00 inet 127.0.0.1/8 scope host lo validlft forever preferredlft forever 2: eth0: <BROADCAST,MULTICAST,UP,LOWERUP> mtu 1500 qdisc pfifofast state UP qlen 1000 link/ether 00:16:3e:02:b6:46 brd ff:ff:ff:ff:ff:ff inet 172.18.61.250/20 brd 172.18.63.255 scope global eth0 validlft forever preferred_lft forever ``
- 网络可达性检查 - ping。
``Shell [root ~]# ping www.baidu.com -c 3 PING www.a.shifen.com (220.181.111.188) 56(84) bytes of data. 64 bytes from 220.181.111.188 (220.181.111.188): icmpseq=1 ttl=51 time=36.3 ms 64 bytes from 220.181.111.188 (220.181.111.188): icmpseq=2 ttl=51 time=36.4 ms 64 bytes from 220.181.111.188 (220.181.111.188): icmp_seq=3 ttl=51 time=36.4 ms --- www.a.shifen.com ping statistics --- 3 packets transmitted, 3 received, 0% packet loss, time 2002ms rtt min/avg/max/mdev = 36.392/36.406/36.427/0.156 ms ``
- 显示或管理路由表 - route。
- 查看网络服务和端口 - netstat / ss。
``Shell [root ~]# netstat -nap | grep nginx ``
- 网络监听抓包 - tcpdump。
- 安全文件拷贝 - scp。
[root ~]# scp root@1.2.3.4:/root/guido.jpg hellokitty@4.3.2.1:/home/hellokitty/pic.jpg- 文件同步工具 - rsync。
> 说明:使用rsync可以实现文件的自动同步,这个对于文件服务器来说相当重要。关于这个命令的用法,我们在后面讲项目部署的时候为大家详细说明。 >
- 安全文件传输 - sftp。
``Shell [root ~]# sftp root@1.2.3.4 root@1.2.3.4's password: Connected to 1.2.3.4. sftp> ``
help:显示帮助信息。ls/lls:显示远端/本地目录列表。cd/lcd:切换远端/本地路径。mkdir/lmkdir:创建远端/本地目录。pwd/lpwd:显示远端/本地当前工作目录。get:下载文件。put:上传文件。rm:删除远端文件。bye/exit/quit:退出sftp。
进程管理
- 查看进程 - ps。
``Shell [root ~]# ps -ef UID PID PPID C STIME TTY TIME CMD root 1 0 0 Jun23 ? 00:00:05 /usr/lib/systemd/systemd --switched-root --system --deserialize 21 root 2 0 0 Jun23 ? 00:00:00 [kthreadd] ... [root ~]# ps -ef | grep mysqld root 4943 4581 0 22:45 pts/0 00:00:00 grep --color=auto mysqld mysql 25257 1 0 Jun25 ? 00:00:39 /usr/sbin/mysqld --daemonize --pid-file=/var/run/mysqld/mysqld.pid ``
- 显示进程状态树 - pstree。
``Shell [root ~]# pstree systemd─┬─AliYunDun───18[{AliYunDun}] ├─AliYunDunUpdate───3[{AliYunDunUpdate}] ├─2[agetty] ├─aliyun-service───2[{aliyun-service}] ├─atd ├─auditd───{auditd} ├─dbus-daemon ├─dhclient ├─irqbalance ├─lvmetad ├─mysqld───28[{mysqld}] ├─nginx───2[nginx] ├─ntpd ├─polkitd───6[{polkitd}] ├─rsyslogd───2[{rsyslogd}] ├─sshd───sshd───bash───pstree ├─systemd-journal ├─systemd-logind ├─systemd-udevd └─tuned───4*[{tuned}] ``
- 查找与指定条件匹配的进程 - pgrep。
``Shell [root ~]$ pgrep mysqld 3584 ``
- 通过进程号终止进程 - kill。
```Shell [root ~]$ kill -l
- SIGHUP 2) SIGINT 3) SIGQUIT 4) SIGILL 5) SIGTRAP
- SIGABRT 7) SIGBUS 8) SIGFPE 9) SIGKILL 10) SIGUSR1
- SIGSEGV 12) SIGUSR2 13) SIGPIPE 14) SIGALRM 15) SIGTERM
- SIGSTKFLT 17) SIGCHLD 18) SIGCONT 19) SIGSTOP 20) SIGTSTP
- SIGTTIN 22) SIGTTOU 23) SIGURG 24) SIGXCPU 25) SIGXFSZ
- SIGVTALRM 27) SIGPROF 28) SIGWINCH 29) SIGIO 30) SIGPWR
- SIGSYS 34) SIGRTMIN 35) SIGRTMIN+1 36) SIGRTMIN+2 37) SIGRTMIN+3
- SIGRTMIN+4 39) SIGRTMIN+5 40) SIGRTMIN+6 41) SIGRTMIN+7 42) SIGRTMIN+8
- SIGRTMIN+9 44) SIGRTMIN+10 45) SIGRTMIN+11 46) SIGRTMIN+12 47) SIGRTMIN+13
- SIGRTMIN+14 49) SIGRTMIN+15 50) SIGRTMAX-14 51) SIGRTMAX-13 52) SIGRTMAX-12
- SIGRTMAX-11 54) SIGRTMAX-10 55) SIGRTMAX-9 56) SIGRTMAX-8 57) SIGRTMAX-7
- SIGRTMAX-6 59) SIGRTMAX-5 60) SIGRTMAX-4 61) SIGRTMAX-3 62) SIGRTMAX-2
- SIGRTMAX-1 64) SIGRTMAX
[root ~]# kill 1234 [root ~]# kill -9 1234 ```
- 通过进程名终止进程 - killall / pkill。
结束名为mysqld的进程。
``Shell [root ~]# pkill mysqld ``
结束hellokitty用户的所有进程。
``Shell [root ~]# pkill -u hellokitty ``
> 说明:这样的操作会让hellokitty用户和服务器断开连接。 >
- 将进程置于后台运行。
Ctrl+Z- 快捷键,用于停止进程并置于后台。&- 将进程置于后台运行。
``Shell [root ~]# mongod & [root ~]# redis-server ... ^Z [4]+ Stopped redis-server ``
- 查询后台进程 - jobs。
``Shell [root ~]# jobs [2] Running mongod & [3]- Stopped cat [4]+ Stopped redis-server ``
- 让进程在后台继续运行 - bg。
``Shell [root ~]# bg %4 [4]+ redis-server & [root ~]# jobs [2] Running mongod & [3]+ Stopped cat [4]- Running redis-server & ``
- 将后台进程置于前台 - fg。
``Shell [root ~]# fg %4 redis-server ``
> 说明:置于前台的进程可以使用Ctrl+C来终止它。 >
- 调整程序/进程运行时优先级 - nice / renice。
- 用户登出后进程继续工作 - nohup。
``Shell [root ~]# nohup ping www.baidu.com > result.txt & ``
- 跟踪进程系统调用情况 - strace。
``Shell [root ~]# pgrep mysqld 8803 [root ~]# strace -c -p 8803 strace: Process 8803 attached ^Cstrace: Process 8803 detached % time seconds usecs/call calls errors syscall ------ ----------- ----------- --------- --------- ---------------- 99.18 0.005719 5719 1 restart_syscall 0.49 0.000028 28 1 mprotect 0.24 0.000014 14 1 clone 0.05 0.000003 3 1 mmap 0.03 0.000002 2 1 accept ------ ----------- ----------- --------- --------- ---------------- 100.00 0.005766 5 total ``
> 说明:这个命令的用法和参数都比较复杂,建议大家在真正用到这个命令的时候再根据实际需要进行了解。 >
- 查看当前运行级别 - runlevel。
``Shell [root ~]# runlevel N 3 ``
- 实时监控进程占用资源状况 - top。
``Shell [root ~]# top top - 23:04:23 up 3 days, 14:10, 1 user, load average: 0.00, 0.01, 0.05 Tasks: 65 total, 1 running, 64 sleeping, 0 stopped, 0 zombie %Cpu(s): 0.3 us, 0.3 sy, 0.0 ni, 99.3 id, 0.0 wa, 0.0 hi, 0.0 si, 0.0 st KiB Mem : 1016168 total, 191060 free, 324700 used, 500408 buff/cache KiB Swap: 0 total, 0 free, 0 used. 530944 avail Mem ... ``
-c- 显示进程的整个路径。-d- 指定两次刷屏之间的间隔时间(秒为单位)。-i- 不显示闲置进程或僵尸进程。-p- 显示指定进程的信息。
系统诊断
- 系统启动异常诊断 - dmesg。
- 查看系统活动信息 - sar。
```Shell [root ~]# sar -u -r 5 10 Linux 3.10.0-957.10.1.el7.x8664 (izwz97tbgo9lkabnat2lo8z) 06/02/2019 x8664 (2 CPU)
06:48:30 PM CPU %user %nice %system %iowait %steal %idle 06:48:35 PM all 0.10 0.00 0.10 0.00 0.00 99.80
06:48:30 PM kbmemfree kbmemused %memused kbbuffers kbcached kbcommit %commit kbactive kbinact kbdirty 06:48:35 PM 1772012 2108392 54.33 102816 1634528 784940 20.23 793328 1164704 0 ```
-A- 显示所有设备(CPU、内存、磁盘)的运行状况。-u- 显示所有CPU的负载情况。-d- 显示所有磁盘的使用情况。-r- 显示内存的使用情况。-n- 显示网络运行状态。
- 查看内存使用情况 - free。
``Shell [root ~]# free total used free shared buff/cache available Mem: 1016168 323924 190452 356 501792 531800 Swap: 0 0 0 ``
- 虚拟内存统计 - vmstat。
``Shell [root ~]# vmstat procs -----------memory---------- ---swap-- -----io---- -system-- ------cpu----- r b swpd free buff cache si so bi bo in cs us sy id wa st 2 0 0 204020 79036 667532 0 0 5 18 101 58 1 0 99 0 0 ``
- CPU信息统计 - mpstat。
```Shell [root ~]# mpstat Linux 3.10.0-957.5.1.el7.x8664 (iZ8vba0s66jjlfmo601w4xZ) 05/30/2019 x8664 (1 CPU)
01:51:54 AM CPU %usr %nice %sys %iowait %irq %soft %steal %guest %gnice %idle 01:51:54 AM all 0.71 0.00 0.17 0.04 0.00 0.00 0.00 0.00 0.00 99.07 ```
- 查看进程使用内存状况 - pmap。
``Shell [root ~]# ps PID TTY TIME CMD 4581 pts/0 00:00:00 bash 5664 pts/0 00:00:00 ps [root ~]# pmap 4581 4581: -bash 0000000000400000 884K r-x-- bash 00000000006dc000 4K r---- bash 00000000006dd000 36K rw--- bash 00000000006e6000 24K rw--- [ anon ] 0000000001de0000 400K rw--- [ anon ] 00007f82fe805000 48K r-x-- libnssfiles-2.17.so 00007f82fe811000 2044K ----- libnssfiles-2.17.so ... ``
- 报告设备CPU和I/O统计信息 - iostat。
``Shell [root ~]# iostat Linux 3.10.0-693.11.1.el7.x8664 (iZwz97tbgo9lkabnat2lo8Z) 06/26/2018 x8664 (1 CPU) avg-cpu: %user %nice %system %iowait %steal %idle 0.79 0.00 0.20 0.04 0.00 98.97 Device: tps kBread/s kBwrtn/s kBread kBwrtn vda 0.85 6.78 21.32 2106565 6623024 vdb 0.00 0.01 0.00 2088 0 ``
- 显示所有PCI设备 - lspci。
``Shell [root ~]# lspci 00:00.0 Host bridge: Intel Corporation 440FX - 82441FX PMC [Natoma] (rev 02) 00:01.0 ISA bridge: Intel Corporation 82371SB PIIX3 ISA [Natoma/Triton II] 00:01.1 IDE interface: Intel Corporation 82371SB PIIX3 IDE [Natoma/Triton II] 00:01.2 USB controller: Intel Corporation 82371SB PIIX3 USB [Natoma/Triton II] (rev 01) 00:01.3 Bridge: Intel Corporation 82371AB/EB/MB PIIX4 ACPI (rev 03) 00:02.0 VGA compatible controller: Cirrus Logic GD 5446 00:03.0 Ethernet controller: Red Hat, Inc. Virtio network device 00:04.0 Communication controller: Red Hat, Inc. Virtio console 00:05.0 SCSI storage controller: Red Hat, Inc. Virtio block device 00:06.0 SCSI storage controller: Red Hat, Inc. Virtio block device 00:07.0 Unclassified device [00ff]: Red Hat, Inc. Virtio memory balloon ``
- 显示进程间通信设施的状态 - ipcs。
```Shell [root ~]# ipcs
------ Message Queues -------- key msqid owner perms used-bytes messages
------ Shared Memory Segments -------- key shmid owner perms bytes nattch status
------ Semaphore Arrays -------- key semid owner perms nsems ```
Shell编程
之前我们提到过,Shell是一个连接用户和操作系统的应用程序,它提供了人机交互的界面(接口),用户通过这个界面访问操作系统内核的服务。Shell脚本是一种为Shell编写的脚本程序,我们可以通过Shell脚本来进行系统管理,同时也可以通过它进行文件操作。总之,编写Shell脚本对于使用Linux系统的人来说,应该是一项标配技能。
互联网上有大量关于Shell脚本的相关知识,我不打算再此对Shell脚本做一个全面系统的讲解,我们通过下面的代码来感性的认识下Shell脚本就行了。
例子1:输入两个整数m和n,计算从m到n的整数求和的结果。
#!/usr/bin/bash
printf 'm = '
read m
printf 'n = '
read n
a=$m
sum=0
while [ $a -le $n ]
do
    sum=$[ sum + a ]
    a=$[ a + 1 ]
done
echo '结果: '$sum
例子2:自动创建文件夹和指定数量的文件。
#!/usr/bin/bash
printf '输入文件夹名: '
read dir
printf '输入文件名: '
read file
printf '输入文件数量(<1000): '
read num
if [ $num -ge 1000 ]
then
    echo '文件数量不能超过1000'
else
    if [ -e $dir -a -d $dir ]
    then
        rm -rf $dir
    else
        if [ -e $dir -a -f $dir ]
        then
            rm -f $dir
        fi
    fi
    mkdir -p $dir
    index=1
    while [ $index -le $num ]
    do
        if [ $index -lt 10 ]
        then
            pre='00'
        elif [ $index -lt 100 ]
        then
            pre='0'
        else
            pre=''
        fi
        touch $dir'/'$file'_'$pre$index
        index=$[ index + 1 ]
    done
fi
例子3:自动安装指定版本的Redis。
#!/usr/bin/bash
install_redis() {
    if ! which redis-server > /dev/null
    then
        cd /root
        wget $1$2'.tar.gz' >> install.log
        gunzip /root/$2'.tar.gz'
        tar -xf /root/$2'.tar'
        cd /root/$2
        make >> install.log
        make install >> install.log
        echo '安装完成'
    else
        echo '已经安装过Redis'
    fi
}

install_redis 'http://download.redis.io/releases/' $1
相关资源
- Linux命令行常用快捷键
|快捷键|功能说明| | ----------| --------------------------------------------| |tab|自动补全命令或路径| |Ctrl+a|将光标移动到命令行行首| |Ctrl+e|将光标移动到命令行行尾| |Ctrl+f|将光标向右移动一个字符| |Ctrl+b|将光标向左移动一个字符| |Ctrl+k|剪切从光标到行尾的字符| |Ctrl+u|剪切从光标到行首的字符| |Ctrl+w|剪切光标前面的一个单词| |Ctrl+y|复制剪切命名剪切的内容| |Ctrl+c|中断正在执行的任务| |Ctrl+h|删除光标前面的一个字符| |Ctrl+d|退出当前命令行| |Ctrl+r|搜索历史命令| |Ctrl+g|退出历史命令搜索| |Ctrl+l|清除屏幕上所有内容在屏幕的最上方开启一个新行| |Ctrl+s|锁定终端使之暂时无法输入内容| |Ctrl+q|退出终端锁定| |Ctrl+z|将正在终端执行的任务停下来放到后台| |!!|执行上一条命令| |!数字|执行数字对应的历史命令| |!字母|执行最近的以字母打头的命令| |!$ / Esc+.|获得上一条命令最后一个参数| |Esc+b|移动到当前单词的开头| |Esc+f|移动到当前单词的结尾|
- man查阅命令手册的内容说明
|手册中的标题|功能说明| | ------------| ---------------------------------------------------------------------| |NAME|命令的说明和介绍| |SYNOPSIS|使用该命令的基本语法| |DESCRIPTION|使用该命令的详细描述,各个参数的作用,有时候这些信息会出现在OPTIONS中| |OPTIONS|命令相关参数选项的说明| |EXAMPLES|使用该命令的参考例子| |EXIT STATUS|命令结束的退出状态码,通常0表示成功执行| |SEE ALSO|和命令相关的其他命令或信息| |BUGS|和命令相关的缺陷的描述| |AUTHOR|该命令的作者介绍|